To scan to email from an HP printer there are 2 major steps:
- Run the Scan to E-mail Wizard
- Configure the printer/scanner
Follow the below detailed instructions; I’m using a HP Officejet Pro 8610 and Office 365 email.
Run the Scan to E-mail Wizard
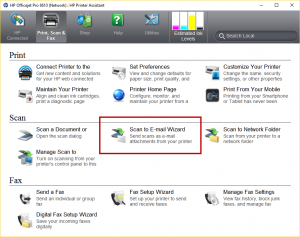
- Run the HP Officejet Pro Software
- This can be downloaded from HP if it’s not on the local computer already
- Run the Scan to E-mail Wizard
- Add a new Outgoing Email Profile
- Add email address, name and PIN

- Click Next
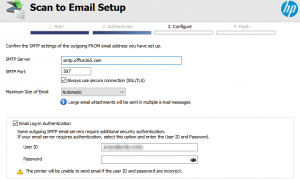
- Configure the SMTP Settings; I’m using Office 365
- Server: smtp.office365.com
- Port: 587
- SSL/TLS: Checked
- Enter O365 User ID and Password

- Click Next
- Optional include sender checkbox
- Click Save and Test

- Add email address, name and PIN
Configure the Printer/Scanner
- Tap the printer touch screen
- Tap Scan > Email

- From:
- Select the profile configured in section above

- Select the profile configured in section above
- To > + (adding a new destination email account)
- Type in email address

- Save with name
- Type in email address
- Subject:
- Optional
- Tap Start Scan to test the setup
There you have it. I use this when sending scans to SharePoint or MS Teams, as well as sending scans to other users emails. A nice use for this is scanning invoices and purchase orders directly to an Invoices or Purchase Orders Document Library in SharePoint. This can be done by leveraging Teams. See Laura Rogers great post on Teams and incoming email.


